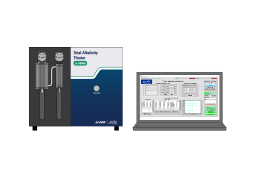
This section presents a tutorial - the procedures you'll follow for a typical Total Alkalinity measurement with the LI-5800A.
Tips for success
Keep these tips in mind as you develop your technical skills and carry out the measurements. Good technique will lead to better experimental outcomes.
-
Samples with suspended particles should be avoided since they may clog the tubing.
-
Use a high-quality, rapid responding pH electrode. Follow the instructions from the electrode manufacturer when preparing a new pH electrode.
-
Use a clean and dry vessel for each titration.
-
Maintain the same routine between the standard and samples, and among sample measurements, including how you move the sample tubing to the titration vessel.
-
When air bubbles are seen in the sample or acid line, flush (and tap) them out. Keep a constant temperature to avoid air bubbles. A few air bubbles inside the sample or acid syringe may not be a problem if they remain stable. If lots of air bubbles appear, check whether the syringe is loose. Hold the syringe (not the water jacket) to tighten it; do not overtighten.
Powering on the system
Turn the titrator power switch on. The indicator light should immediately come on. Turn the pH meter power on. Check the data cable connection between the computer, titrator, and pH meter. Power on the computer and log in.
Setting the syringe pump HOME position
The home position of the syringe is set automatically when it is initialized. However, if there is liquid in the syringe or the outlet tube is restricted during initialization, the system may not correctly identify the home position. To correct this, be sure that liquid can flow freely out of the syringe when the plunger moves, and initialize the syringe again. Repeat the initialization multiple times, if necessary, until the syringe is free of liquid and can identify the correct home position.
Starting the analytical program
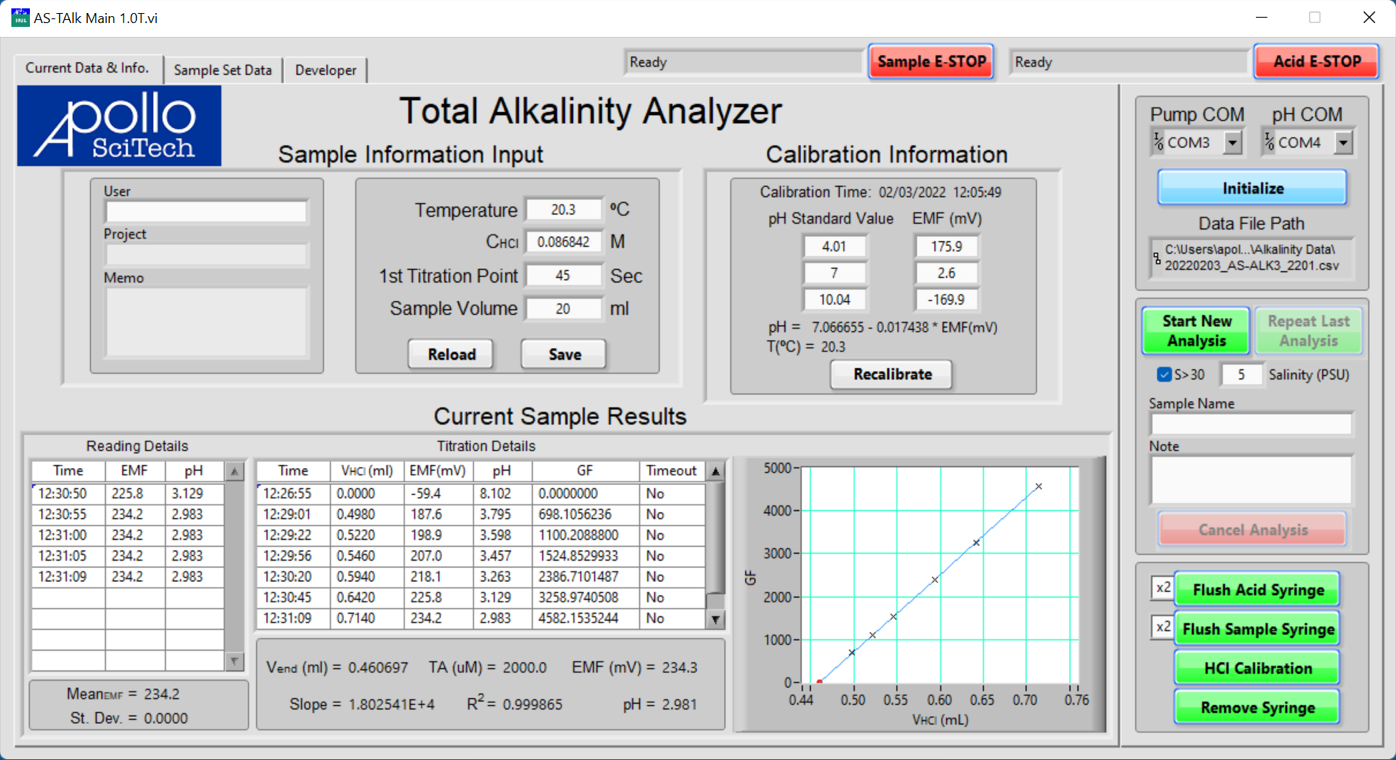
The program will display the Current Data & Info tab. It is mostly blank at first, beckoning your interactions that will soon make it interesting and informative.
Note: If the interface does not fit on the screen, adjust the display settings. Press the Windows key ( ), type display, and press Enter. In Display settings, change Scale and Layout to either 125% or 100%.
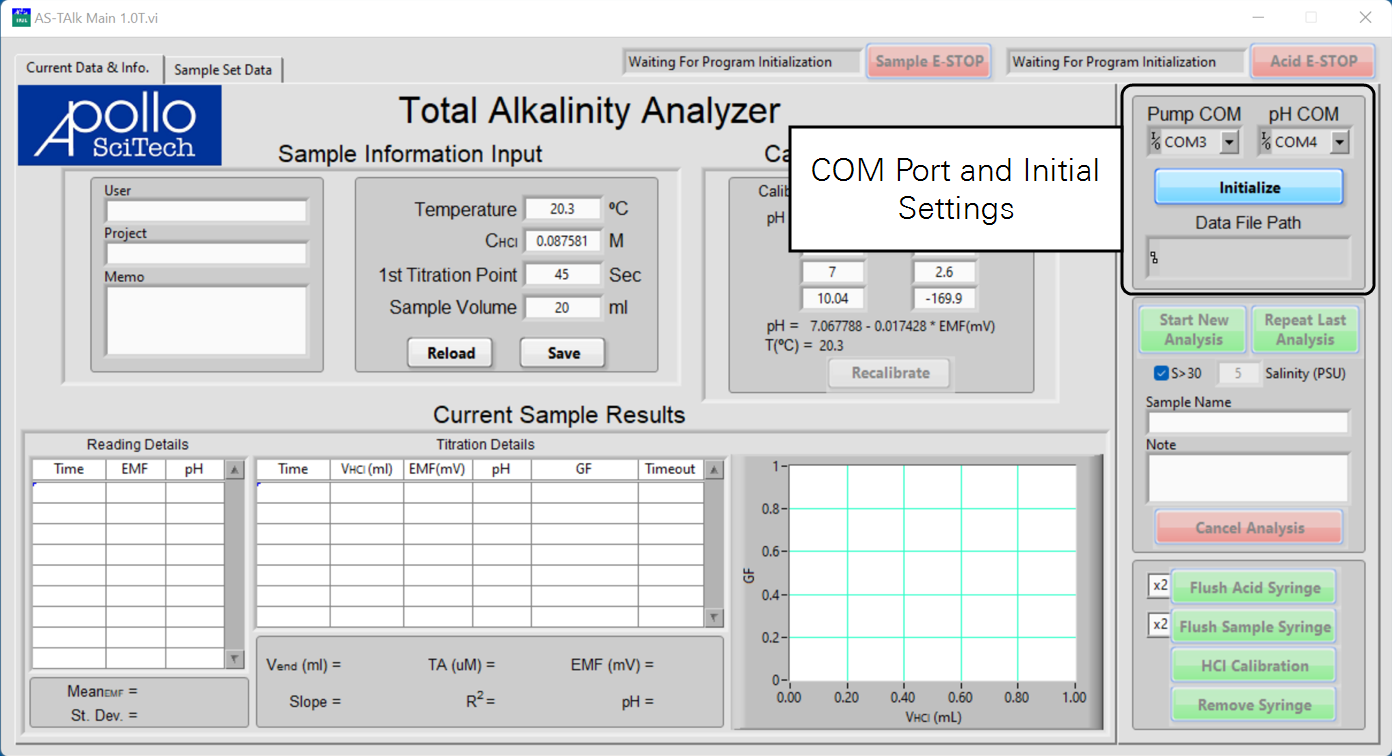
The status fields of both pumps are to the left of their respective emergency stop buttons (E-STOP). Both status fields should display Waiting For Program Initialization at this point.
-
In the menus for Pump COM and pH COM, set the COM port numbers for the pumps and the pH meter.
To find the serial port number, open the Device Manager (press the Windows key
 , type Device Manager, then press Enter). Click Ports (COM & LPT). Look for USB Serial Port (COM#). The serial port numbers are shown beside the ports.
 -
Click Initialize to establish connections.
-
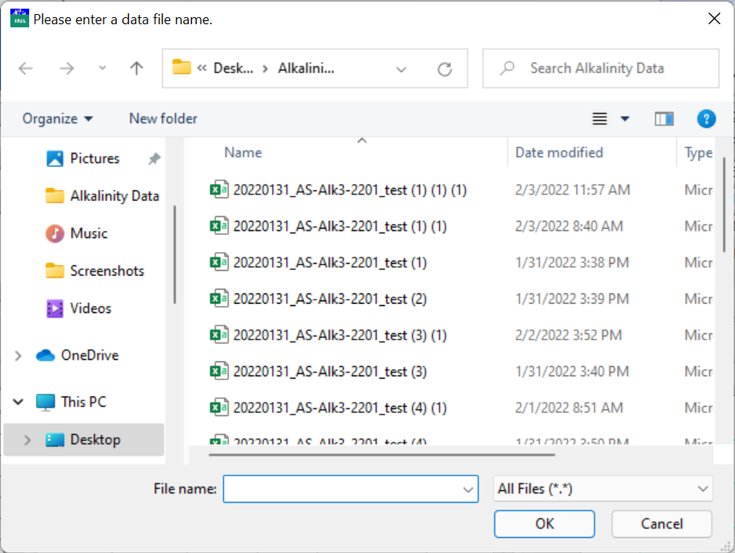
Enter the data file name and choose where to save it, and click OK when finished.
-
Both status fields should display Ready if the pumps are connected to the program.
You should also hear a buzz from the pump and observe that the syringe moves down a bit before moving up. If you click the Initialize button again, you may choose to continue using the current data file or start a new file.
- Both EMF (mV) and pH should update every 5 seconds under the table Titration Details if the pH meter is connected to the program.
- Then the program will flush the HCl syringe twice if this is the first time that connection is established after opening the program.
-
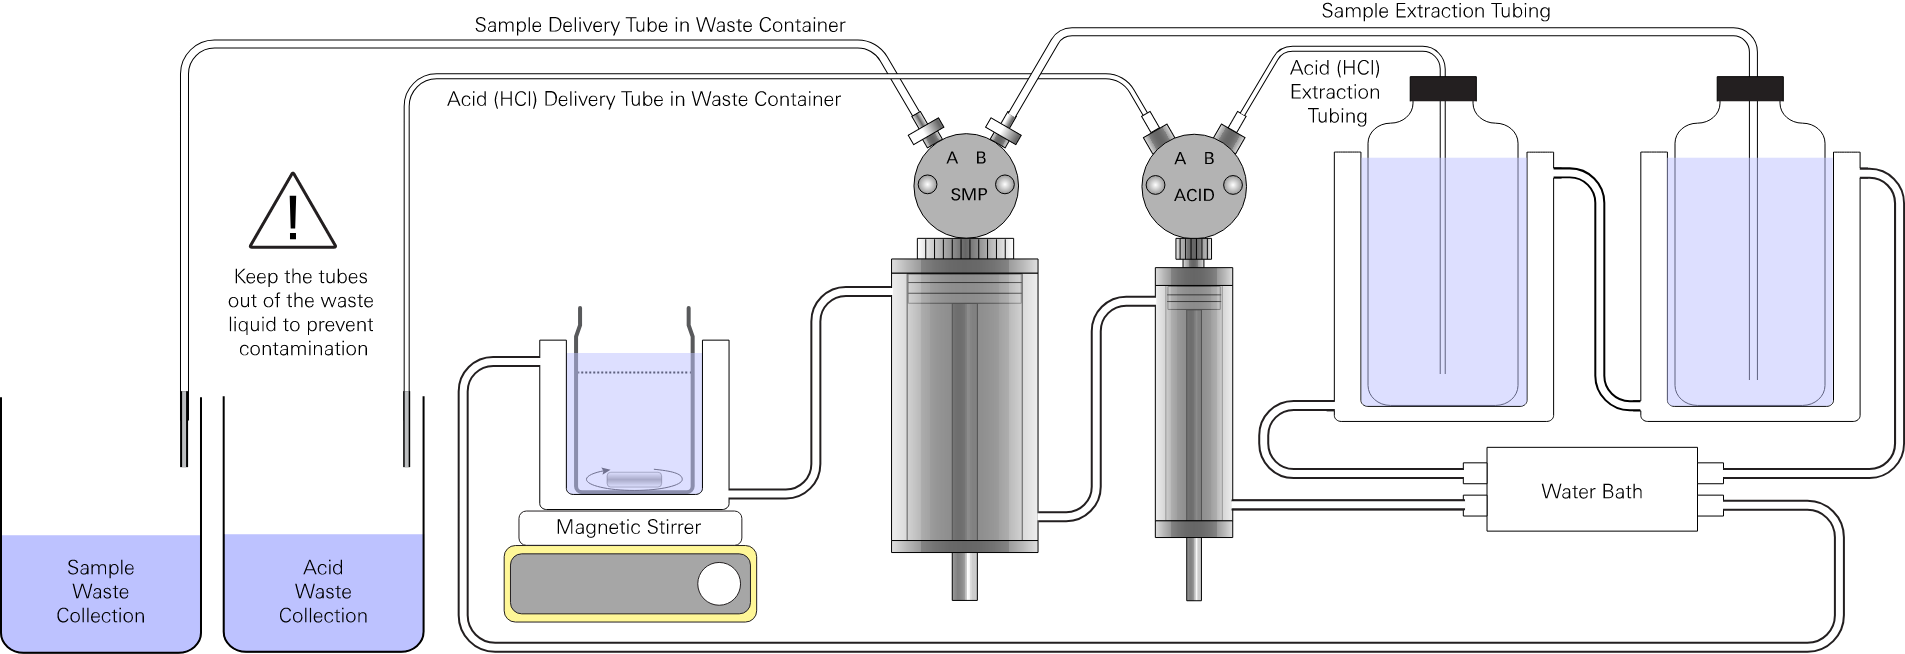
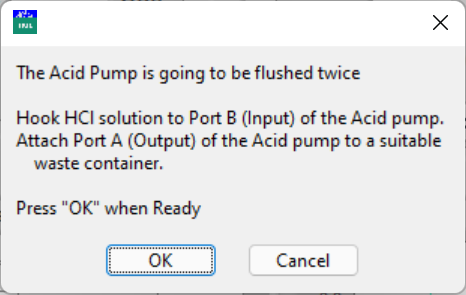
Follow the instructions to connect the HCl solution to port B of the HCl pump and a waste container to port A.
-
Click OK when ready or click Cancel to skip flushing the HCl syringe.
Standardizing the measurements
The standardization or calibration for the system can be done in the main menu.
Calibrating the pH electrode
Three pH buffer solutions are required for the pH electrode calibration.
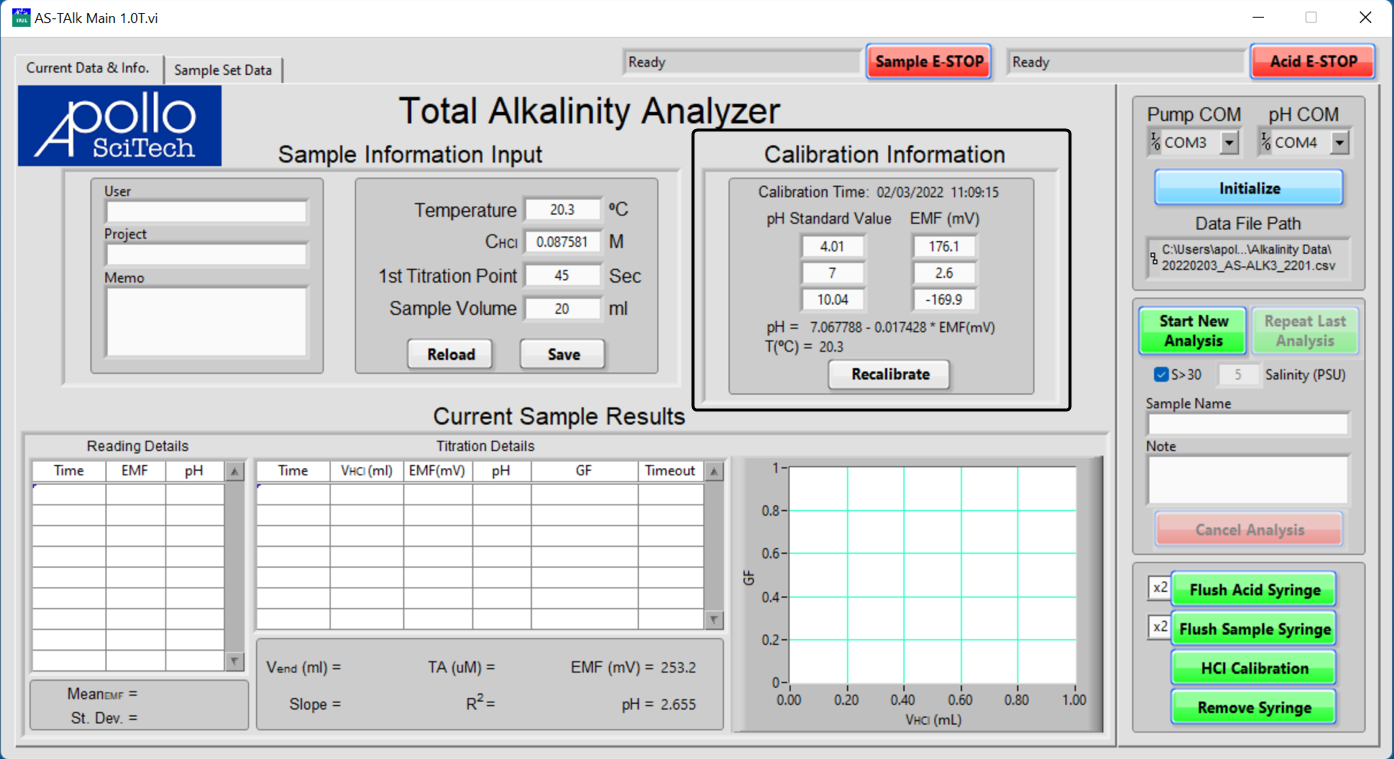
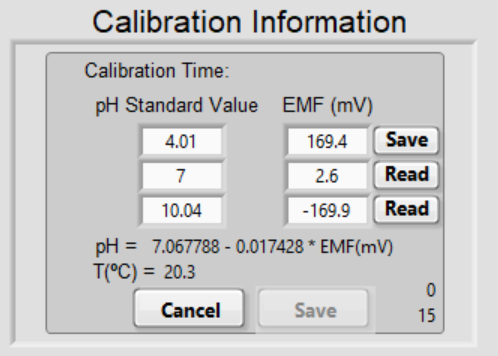
The Calibration Information displays the date and time of the previous calibration, the pH values and the corresponding EMF readings, the best-fit line of pH-EMF based on those three readings, and the temperature at which the calibration was performed. If a new calibration is necessary:
-
Click Recalibrate.
-
Enter the temperature of pH buffers under Sample Information Input and click Save in that box.
You need to calculate the pH at the current temperature and enter the temperature-corrected pH values in the appropriate boxes. The program is not capable of correcting the pH based on the input temperature because of the lack of knowledge of the pH buffers that you use.
-
Put the electrode in the first pH buffer, click Read.
Notice that the EMF box displays the reading from the pH meter and the Read button becomes Save.
Two numbers at the bottom right start to count up. The first one indicates the time in seconds that the current reading has been stable. The second one indicates the total time elapse in seconds after you click Read for that pH buffer. The pH meter outputs a reading every 5 seconds, but with the minor internal delays, the time displayed here might occasionally increase in increments of 4 seconds; this is normal.
-
When the reading is stable, click Save.
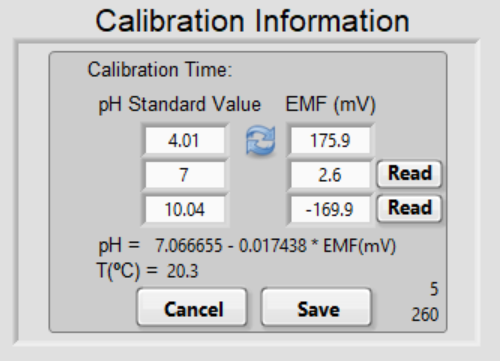
We recommend saving the reading when it is stable for at least 1 minute – when the top number is 60 or larger. The Save button will disappear and circling arrows will appear. If you need to redo the readings in any buffer, click the arrow and the program will restart reading.
-
Similarly, get stable EMF readings for the other two buffers and click Save.
Notice that the best-fit line automatically updates. The efficiency of the electrode must be better than 95% to achieve high-quality data. The efficiency is the actual ratio of the slope of the best-fit line to the theoretical slope at the current temperature. The slope is ~59 mV/pH unit at 25 °C. If the efficiency is below 95%, a pop-up window will alert the user. The user can accept the low efficiency electrode or go back to the electrode calibration box to redo all the above.
A perfect pH electrode reads about 0 mV at pH 7, +177 mV at pH 4, and -177 mV at pH 10, all at 25 °C. The electrode response should be rapid.
Standardization of the HCl solution
To perform the standardization of the HCl solution using a TAlk standard solution:
-
Near the bottom right of the main window, click the green button labeled HCl Calibration.
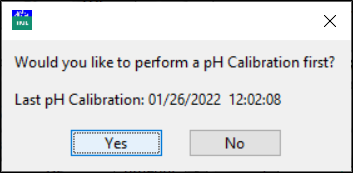
If the previous pH electrode calibration was performed more than an hour ago, the program prompts you to perform a pH electrode calibration first.
-
Click Yes to proceed to a pH electrode calibration or click No to start the HCl calibration.
-
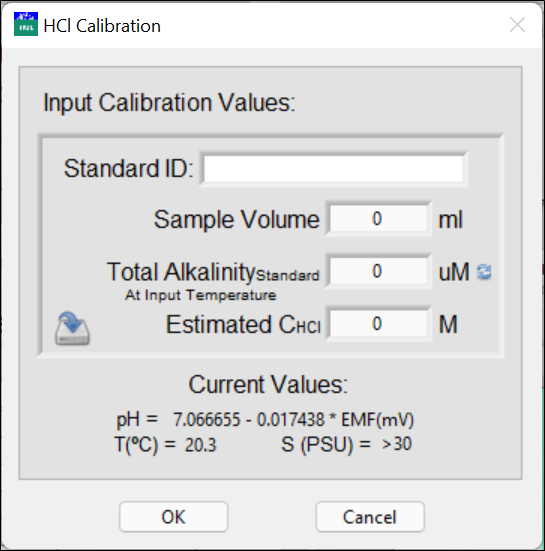
Enter the ID of the TAlk standard solution, sample volume, total alkalinity of the standard solution at the input temperature in μM (μmol/L), and an estimated concentration of the HCl solution.
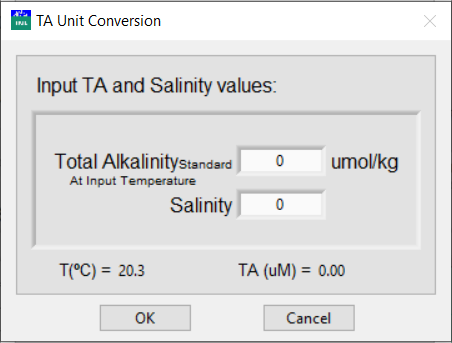
Normally, the alkalinity of the standard solution is reported in μmol/kg. This concentration does not vary with temperature. Click the circling arrows to access the total alkalinity unit conversion.
-
Enter the reported alkalinity in μmol/kg and salinity.
The program automatically calculates the density based on the input salinity and temperature and, in turn, calculates the total alkalinity in μM. The calculations for density in kg/L follows the equation from Millero and Poisson (1981).
-
Click OK to save the input parameters.
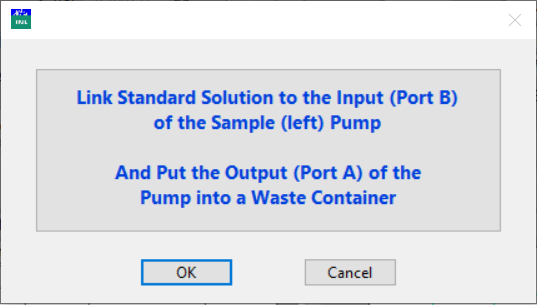
A new pop-up window will remind you to connect port B of the sample pump to the standard solution and put the tube from port A to a waste container.
-
Click OK.
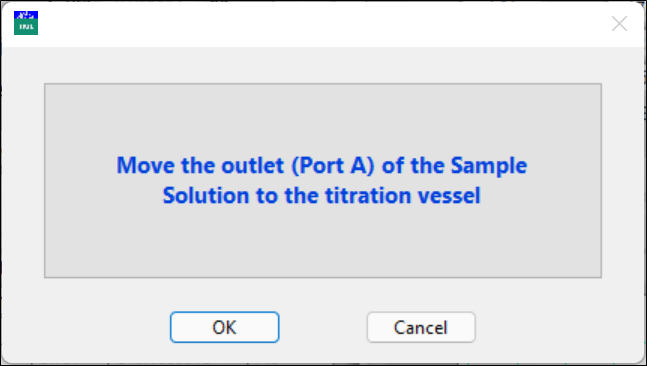
The left syringe pump will be rinsed with the standard solution three times, twice with 2.5 ml and once with the volume for calibration (or later for sample analysis), and then will draw the solution for analysis. Keep the tubing outlet in the sample waste container until the syringe is filled to the volume with the standard solution. A new pop-up window will remind you to move the outlet to the titration vessel to collect the sample for titration.
-
Now, move the tubing outlet to the titration vessel.
-
Click OK when ready.
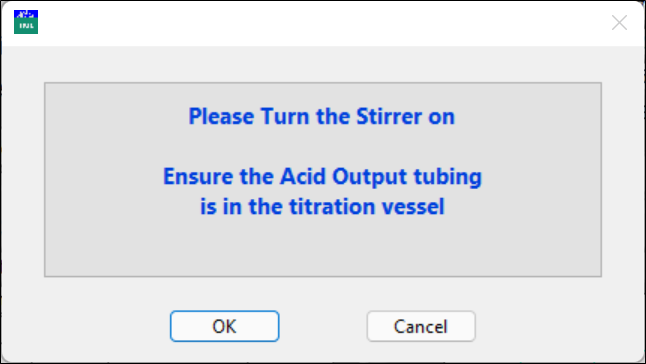
The solution in the syringe will be transferred to the titration vessel. The program will remind you to turn on the stirrer.
-
Click OK when ready.
Make sure that the HCl outlet tubing is inside the vessel and the speed of the stirrer is appropriate.
Note: The HCl outlet tubing is best attached to the pH probe using a piece of Parafilm. The outlet tip should be about 1 mm lower than the reference junction of the pH electrode. Set the stirrer speed fast enough to form a spiral, but not so fast that it generates air bubbles.
-
Then the system measures the initial pH of the sample.
As readings become available every 4 to 5 seconds, they are displayed in the table and the graph in the box Current Sample Results.
When the initial pH reading is stable, the results are displayed in the table of Titration Details. It starts to add acid in the titration to bring the pH to just below 3.8. As usual, readings are displayed in the table Reading Details and in the graph.
The program will wait for 45 seconds before checking whether the pH is just below 3.8. If it is, then it will proceed with the titration by adding more acid stepwise. If the pH is above 3.8, it will add more acid to bring the pH to just below 3.8 and will wait for another 45 seconds before checking again.
The waiting period before the first titration point can be set by the user in the Sample Information Input box. And this waiting period allows the CO2 gas to escape and to condition the pH electrode. With a new pH electrode, a 30-second waiting period is enough. However, when the response of a pH electrode becomes sluggish (when it ages or is abused), a longer waiting time will improve the precision. While you will see variations when different waiting times are used, as long as the waiting period is the same for the standard and the samples, the difference will cancel out.
The titration is completed when the pH is stable at a pH below 3.0. When the titration is finished, it calculates the slope and R-squared of the straight-line portion of the GF-V(HCl) relationship and, in turn, Vend. The graph area will show the straight-line and Vend. All of the data in the table of Titration Details are saved in the data file.
-
Measure the next sample or stop.
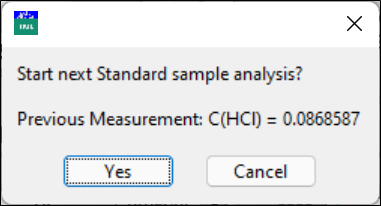
Click Yes to start a repeat of the titration or Cancel to escape.
Finishing the calibration
Turn off the stirrer, remove the titration vessel from the beaker on the top of the stirrer, rinse the pH electrode and the HCl outlet tubing with DI water, and then gently blot dry the electrode with a piece of Kimwipe® tissue.
Note: Do not scrape the reference junction and the bulb of the pH electrode. Scratches will slow down the response of the pH electrode and cause the titration results to be inaccurate. Most importantly, do not allow the bulb to touch any hard surface such as the wall of a glass beaker.
-
Use another clean and dry vessel for the next titration.
-
Put a clean and dry stirrer bar in the vessel.
-
Put the standard (or next sample) solution outlet in the vessel.
-
Transfer the solution to the titration vessel.
-
Remove the standard solution outlet tubing from the vessel and follow the instructions on the window.
-
Now, put the vessel back (inside the beaker) on the top of the stirrer.
-
Put the pH electrode and the HCl outlet tubing inside the vessel.
-
Be careful that the bottom of the pH electrode is clear of the stir bar.
-
Turn the stirrer on and start the titration.
-
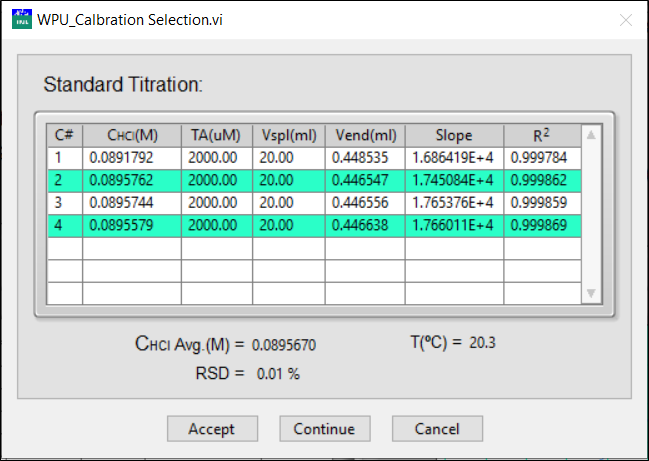
After two titrations are available, the program calculates the average and Relative Standard Deviation (RSD) of the calculated HCl concentrations.
-
If the RSD is below 0.1%, the average concentration can be accepted - click Accept to save the HCl concentration in the Sample Information Input.
Otherwise, click Continue to obtain another repeat.
-
Click Cancel to escape and the HCl concentration in the main window will not be changed.
The repeats selected for the calculation are highlighted in green. You can select two rows in the list to calculate the AVG or RSD for the selection.
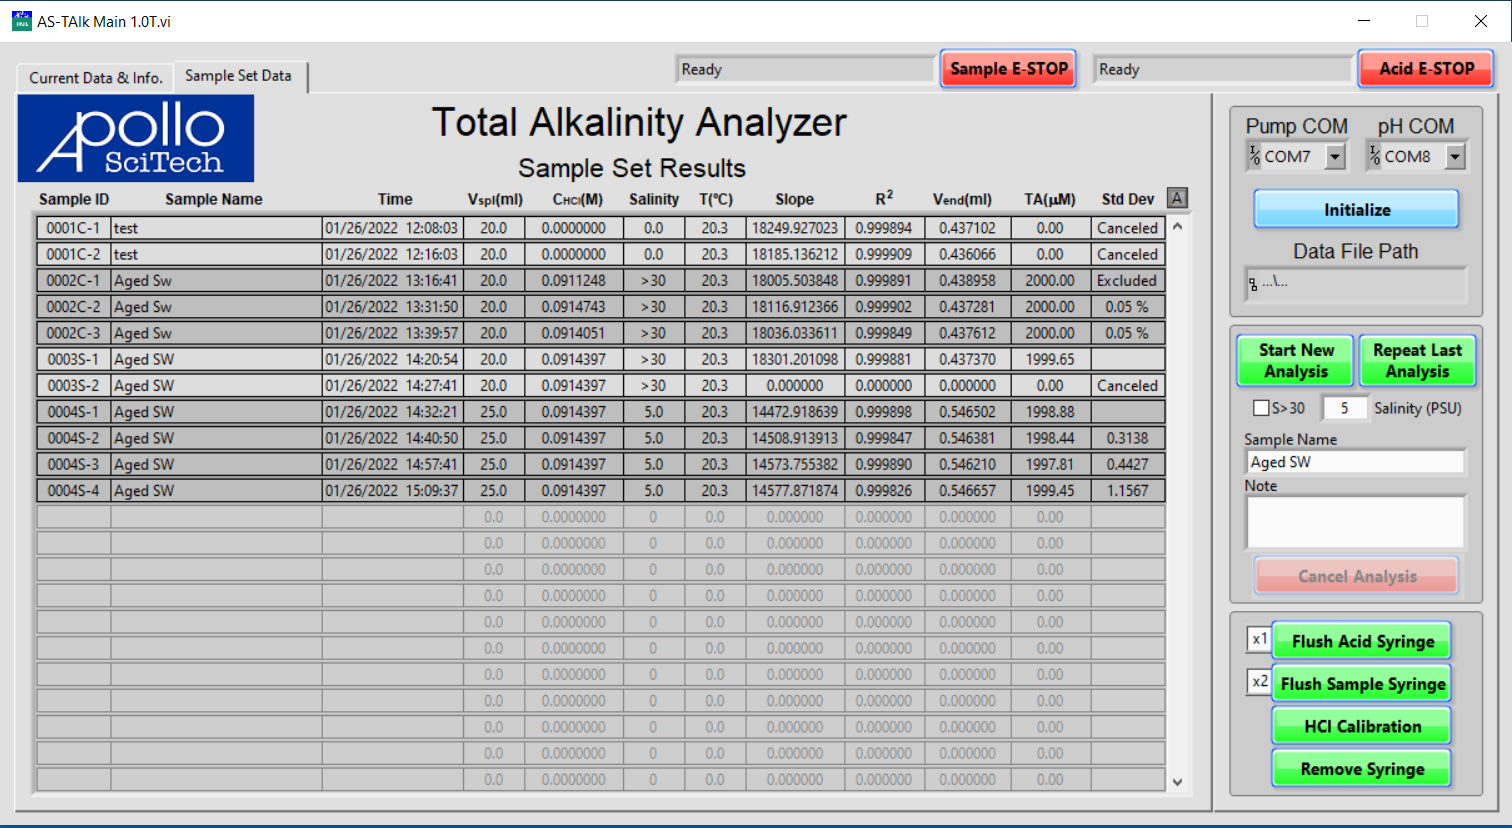
- All of the titration results are recorded in the Sample Set Data.
- Sample ID starts from 0001 and increases by 1 for each new sample.
- The letter C is added after the number for a calibration analysis.
- The letter S indicates a sample.
- The number after the dash signifies the number of repeats of the sample.
- Canceled titrations are labeled as Canceled in the column for standard deviations.
-
For the calibration analyses, a standard deviation is calculated for the two accepted repeats; all other repeats are labeled as Excluded.
-
For the sample analyses, a standard deviation is calculated with respect to the previous repeat; therefore, it is left blank for the first repeat of any sample.
Taking sample measurements
After calibration, the system is ready to take a measurement. The program shows the main window.
-
Enter the sample volume in Sample Information Input.
Click Save to save the current values and click Reload to revert to last saved values.
-
For seawater samples, check the box of S > 30; for samples with a known salinity, input the salinity.
This information helps the program to estimate the amount of acid to add in the first step and reduces the time it takes to finish the titration: high salinities lead to higher volumes of acid added in the first step. Overestimating the salinity will cause more than enough acid to be added, so the pH may decrease to a value much lower than 3.8. The titration always ends when pH is below 3.0. Therefore, starting from a value much closer to 3.0 leads to fewer points being available for the best-fit line, which might cause larger uncertainties in the final result. In contrast, underestimating salinity causes the program to add acid stepwise before pH reaches just below 3.8. The only downside of this approach is longer measurement time. Therefore, it may be better to underestimate or even intentionally enter a number slightly lower than the salinity, especially for samples where salinity is not related to total alkalinity in a similar way to typical seawater.
-
Enter a sample name in the box below the salinity input.
-
Click the green button to Start New Analysis to start the titration of a new sample.
In the pop-up window, confirm or make appropriate changes in the sample name, sample volume, and salinity.
-
Click START when ready.
The steps are similar to those in the standardization. The program will remind you to connect the sample solution to port B of the sample pump and port A to the waste bottle.
-
The analyzer will perform the titration and calculation (end point acid volume and TAlk) according to the automated titration procedure and the Gran titration theory.
When the automated titration is finished, it displays the result of the titration and return to the main window. If more repeats are necessary for the previous sample, click Repeat Last Measurement. The titrator will not rinse the pump syringe. It will draw the last sample to the same volume and remind you to put the sample outlet to the titration vessel to collect the sample.
While the titration is underway, you may choose to prepare the repeat or a new sample. To do so, click either green button Start New Analysis or Repeat Last Analysis as you would at the end of the titration. When the sample pump finishes injecting the sample to the new titration vessel, a new green button, Start Titration, will replace the previous two. When the current titration finishes, clean and dry the electrode and follow instructions on the screen to start the next titration.
Canceling the measurement
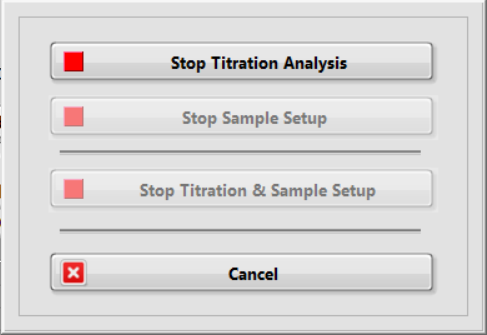
When the titration in underway, click the red button Cancel Analysis to cancel the current and/or the next titration.
Click Stop Titration Analysis to cancel the current titration. The acid pump will stop adding acid to the titration vessel. A pop-up window asks whether you want to empty the acid syringe.
Click Yes to empty the acid to an appropriate container and then click OK when ready. Click No to return to the main window. Normally, you do not need to empty the syringe, as the same acid is used for all the titrations.
If the sample pump is preparing the next analysis, then the other two buttons, Stop Sample Setup and Stop Titration & Sample Setup are enabled.
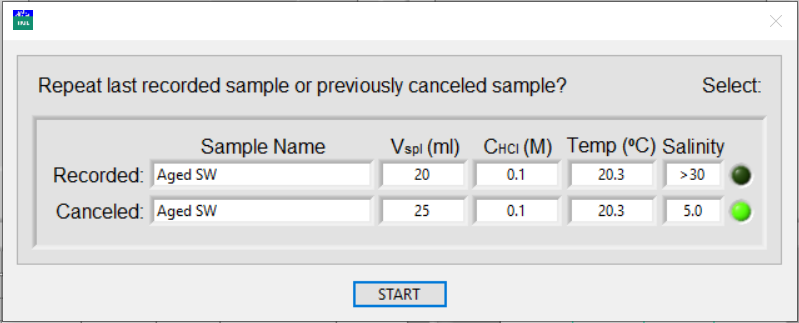
Click Stop Sample Setup to cancel the next titration. A pop-up window will remind you to move the outlet tube to the sample waste container. Then, if you click Repeat Last Analysis, a pop-up window asks whether the previously analyzed sample or the canceled sample is to be repeated.
Click Stop Titration & Sample Setup to cancel both the current and the next titration.
Click Cancel to go back the main window without interruption.
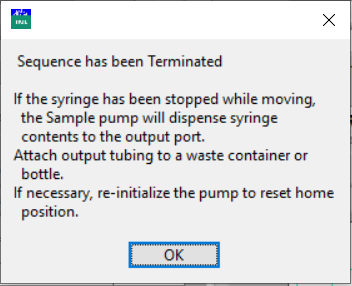
In addition to Cancel Analysis, emergency stop buttons for the pumps are available. Click either Sample E-STOP or Acid E-STOP to halt all actions of either pump. If the syringe is moving, it will be stopped. Follow the instructions in the pop-up message to collect the waste. Re-initialize the pump to reset the home position, if necessary.
Viewing historical data
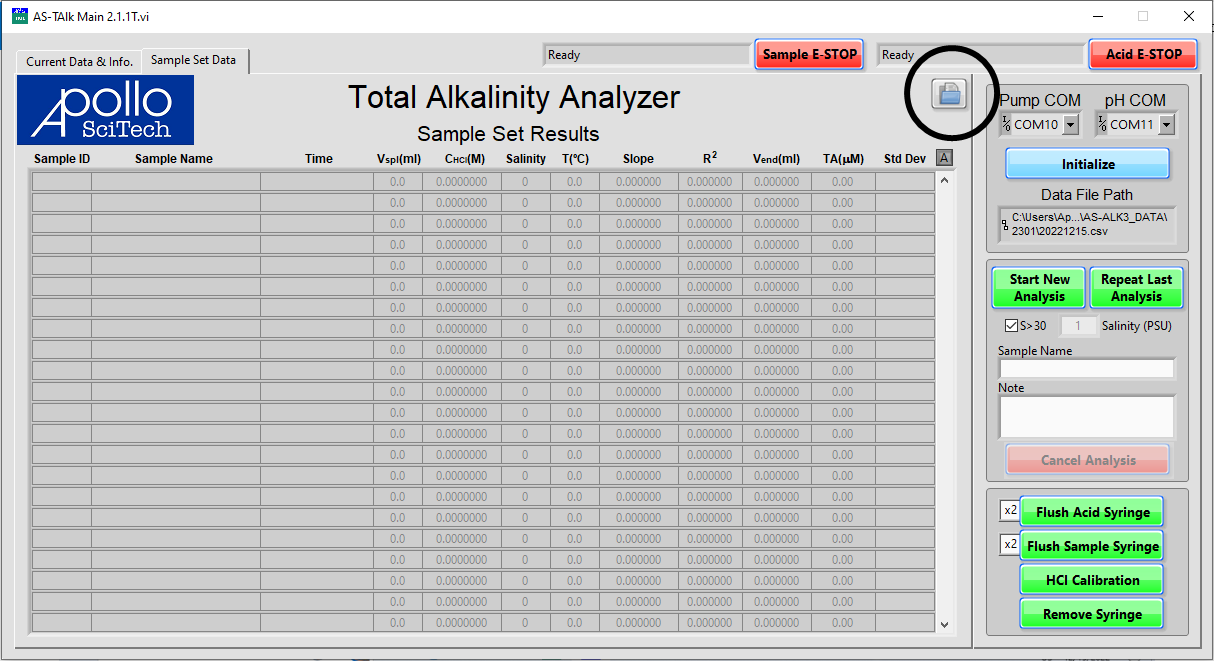
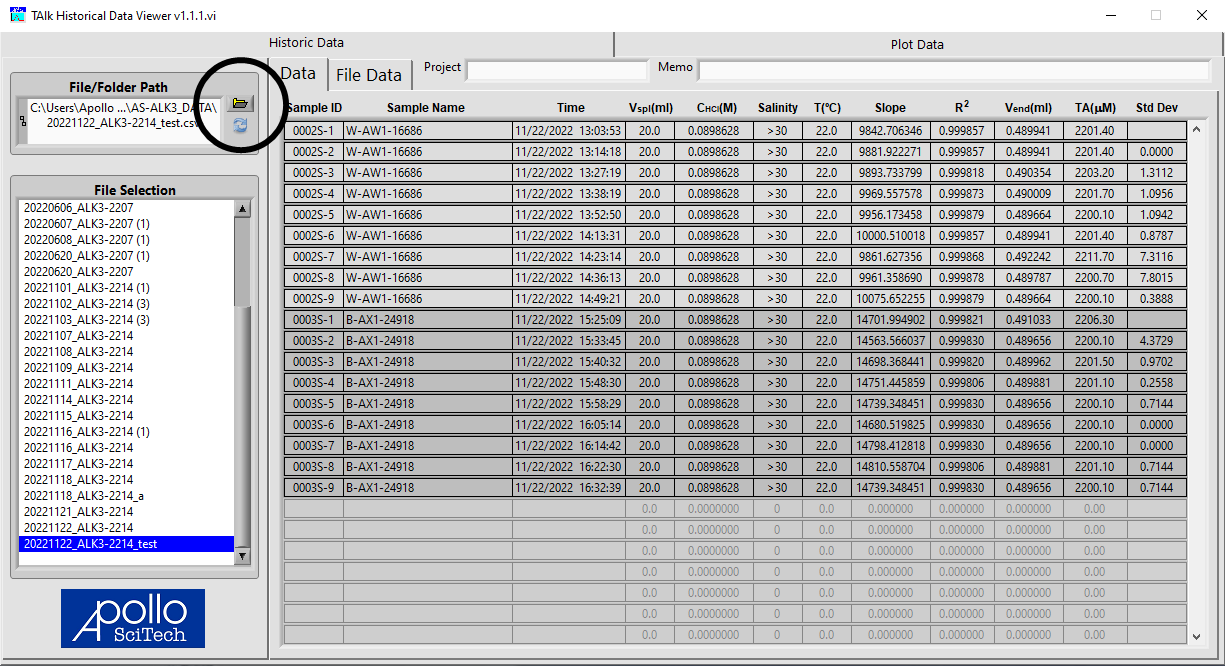
In the main window, under the Sample Set Data tab, click the folder icon near the top right corner of the data table to bring up the historical data viewer.
Click the Open Folder icon to select the data file to view.
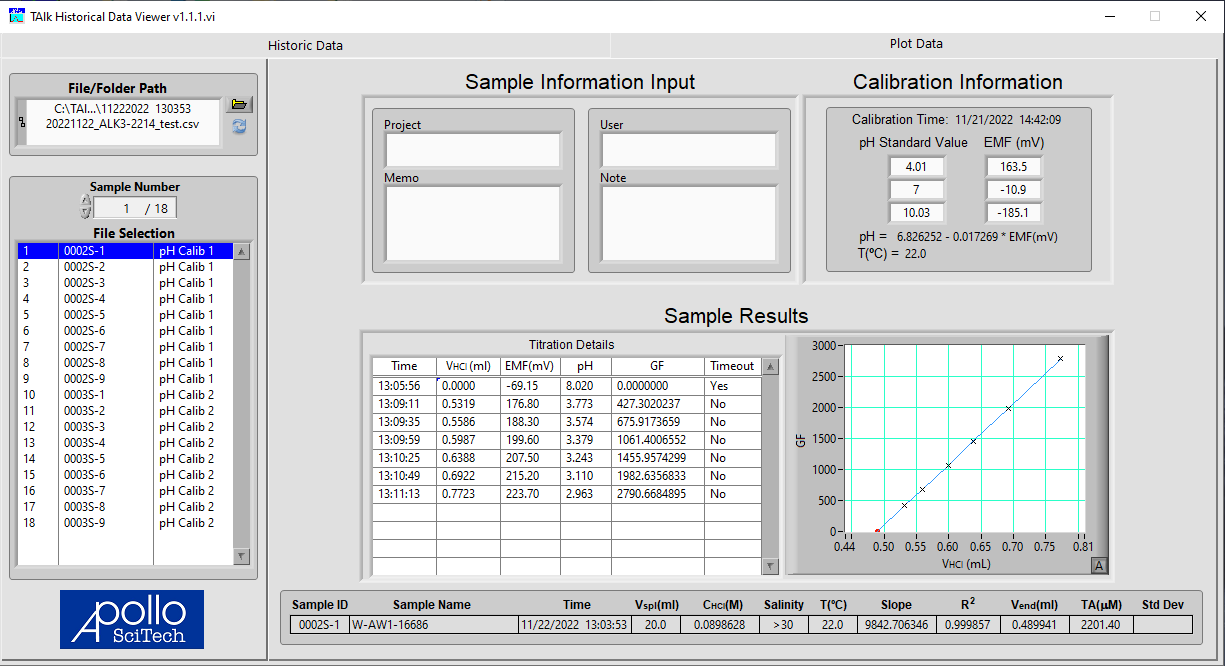
All data files in the same folder will be listed in the box. Select the file and the data table will be displayed on the right. Click on the tab Plot Data to view the detailed results of each sample. Select a sample to view in the box on the left.
Close the program
Before closing the program, flush both syringes with DI water.
-
Set the rinse repeats to either once or twice for each syringe.
To the left of the button, there is a button labeled with x1. Click it to change to x2 if either syringe needs to be flushed twice.
-
Click both buttons to flush both syringes.
-
When the syringes are sufficiently cleaned, close the program.
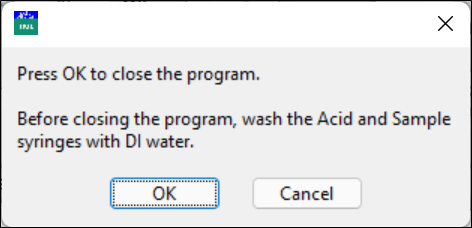
A pop-up window asks you to confirm that both syringes have been cleaned with DI water.
-
Click OK to close the program or Cancel to return to the main window.
-
Power off the titrator and the pH meter.
Occasionally, there may be air bubbles inside the syringe. Use the flush syringe functions to get rid of the bubbles. If it is unsuccessful, you may need to remove the plunger from the syringe, following the steps described in Removing the syringe.
