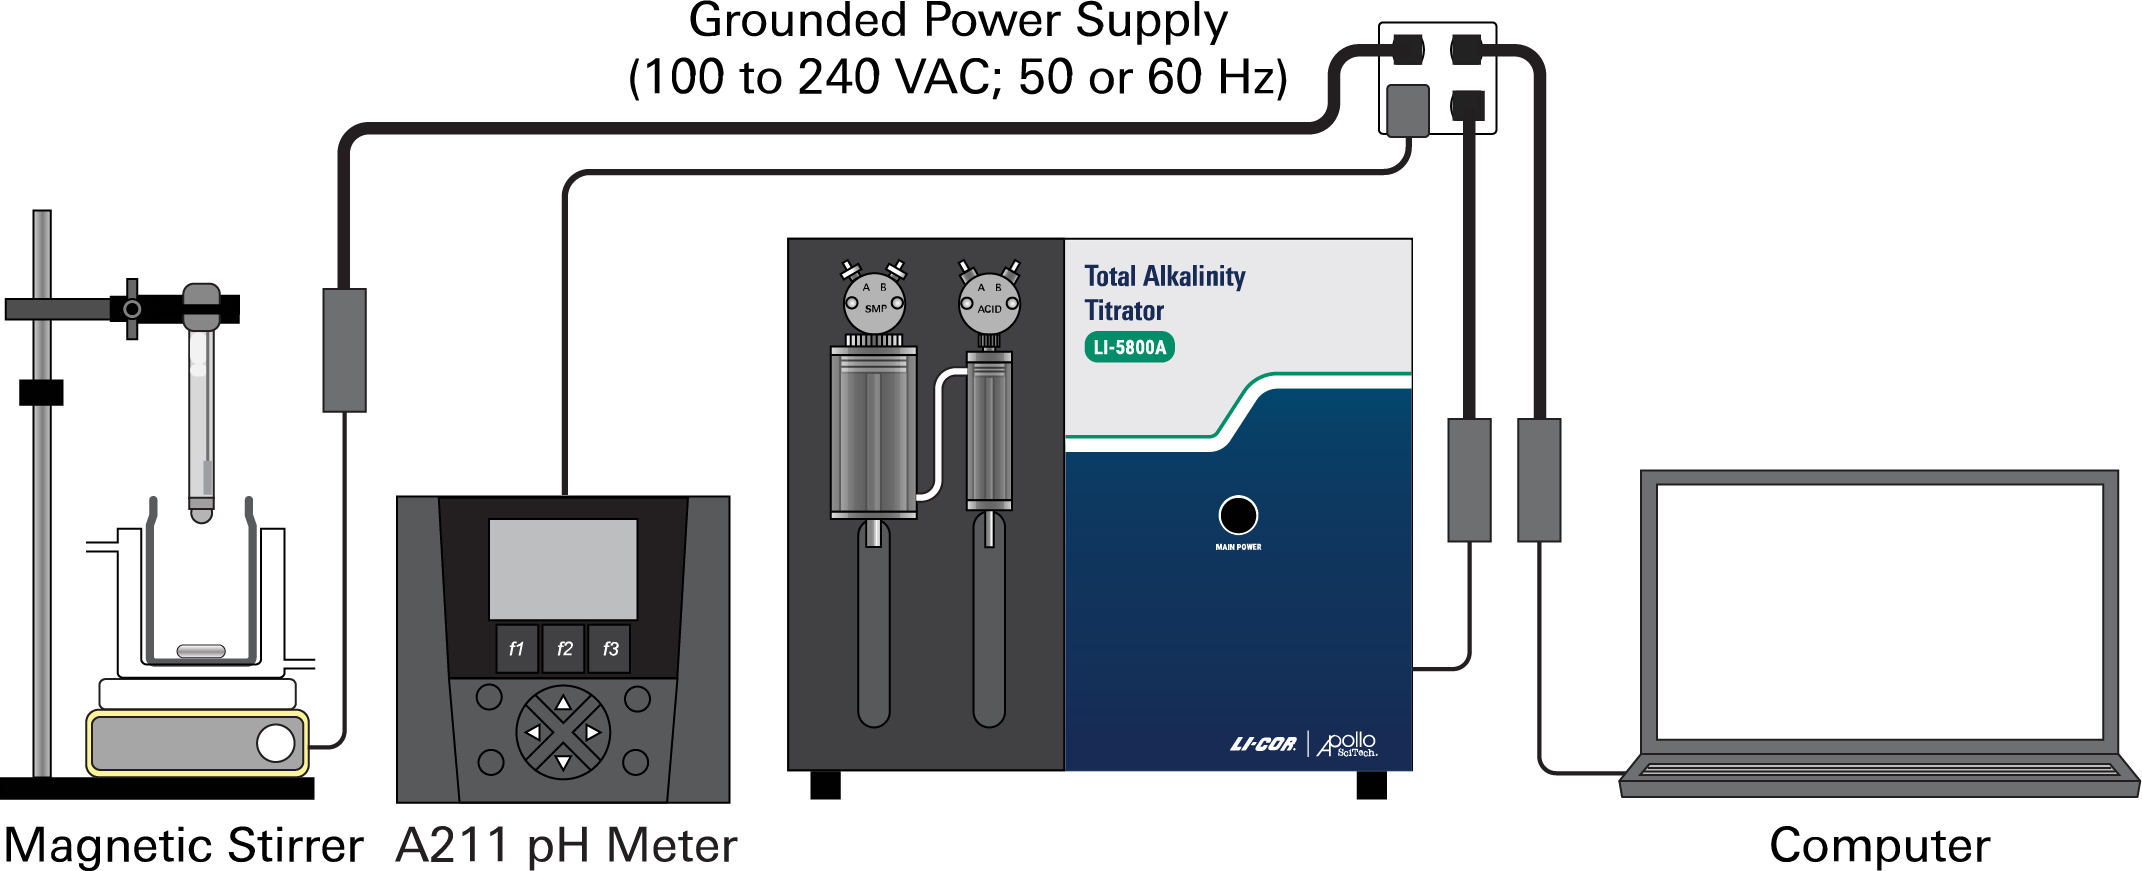
The LI-5800A should be installed in a laboratory with access to an AC power supply (100 to 240 VAC; 50 or 60 Hz) and waste drain. Note that some of the chemicals used by this device are not to be disposed in municipal sewage drains and may need to be disposed of as hazardous chemicals. Be sure to follow good environmental practices and legal requirements regarding hazardous chemicals.
Connecting data cables
One USB-to-serial (RS-232) adapter (LI-COR part number 392-07228) and a serial cable (LI-COR part number 392-08961) is used to connect the titrator to the computer. A second USB-to-serial adapter and a serial cable (included with the pH meter) is used to connect the pH meter the computer. The pH probe connects to the pH meter.

Connecting the power supplies
Each component has a power adapter that is compatible with global power supplies. Connect power adapters for each component to a power outlet. Power on each component.
Before running the program, check the serial port numbers assigned to each port on the computer.
To find the serial port number, open the Device Manager (press the Windows key  , type Device Manager, then press Enter). Click Ports (COM & LPT). Look for USB Serial Port (COM#). The serial port numbers are shown beside the ports.
Preparing for measurements
This section describes the steps you'll take in preparation for measurements.
Alkalinity standard
Either a Certified Reference Material (CRM) or a Na2CO3 standard solution with a known total alkalinity concentration should be used to calibrate the titrator. A CRM of seawater whose total alkalinity and total dissolved inorganic carbon (DIC) has been precisely determined is available from Dr. A. D. Dickson of Scripps Institute of Oceanography, UCSD, La Jolla, CA 92093, USA. Once a bottle of CRM is opened, its TAlk value may change over time due to the interaction with ambient carbon dioxide. Re-inserting the stopper and storing the CRM in a refrigerator between uses may slow down the change.
A standard solution of Na2CO3 can be prepared following these steps:
- Heat Na2CO3 solids at 285°C for 2 hours.
- Allow the Na2CO3 to cool to room temperature in a desiccator.
- Weigh the correct amount of Na2CO3 with an analytical balance.
- Dissolve the solids in DI water in a volumetric flask.
The final concentration of the Na2CO3 solution should be similar to the expected TAlk of the samples that will be analyzed. For example, if you plan to analyze seawater samples with a nominal TAlk concentration of 2300 µmol/L, dissolve 0.122 g Na2CO3 (molecular weight of 105.99 g/mol) in 1 L of DI water. Compare prepared Na2CO3 solution to a CRM.
Finally, aged offshore seawater is a good alternative standard for routine lab work. This seawater should be checked against the CRM from time to time to ensure its stability.
HCl solution
To analyze seawater samples, the suggested concentration range of the HCl titrant solution is 0.1 M. The volume of HCl solution used to complete the titration should be less than 1 mL. When more than 1 mL of HCl solution is needed for a titration, the HCl syringe will refill during the titration. This refilling step should be avoided as the precision of the titration may be affected. Practice is necessary to determine the best acid concentration and sample volume for your samples. To measure samples with high alkalinity, more concentrated HCl titrant and/or smaller sample volumes should be used. For samples with low alkalinity, lower HCl concentrations should be used.
The best practice is to add some NaCl to the titrant so that the ionic strength matches that of the sample. Ionic strength is used to calculate the activity coefficient, which is the ratio of the ion's activity to its concentration. An activity coefficient is intrinsically less than 1 and can be approximated as 1 only for very dilute ideal solutions. Therefore, matching the titrant's ionic strength to that of the sample can minimize the uncertainties caused by changes in the activities of the ions as much as possible.
But, to accurately calculate ionic strength, you need the concentration of every single ion present in the solution, which is even more detailed than what you are trying to measure. So, to get a first order estimation, add NaCl to match the salinity of the sample.
Sample volume considerations
The recommended volume of sample for each analysis is 20 to 25 mL titrated in a 30-mL titration vessel.
If you need to analyze a sample volume smaller than 12 mL, a smaller titration vessel may be used. When the sample volume is very limited, you may skip the digital syringe and supply the sample directly from a hand-held syringe to the titration vessel. If you need to analyze a volume less than 5 mL, contact LI-COR for recommendations. You will need to experiment to find a titration vessel wide enough to accommodate the electrode and narrow enough to allow the sample to cover the electrode’s reference junction. In general, more skill and care is required to analyze smaller volumes of sample. During standardization and titration of the sample, you should keep your analysis procedure and cell configuration as consistent as possible.
When the water sample volume is very limited and cannot be wasted for washing the sample syringe, one may weigh the sample in a clean and dry vial using an electronic balance. You may then input this weight (in grams) as volume (in mL) in the titration program. In this case, the final TAlk value will be molality (in μmol/kg), and thus avoiding the need to convert molarity to molality by using density.
Water bath configurations
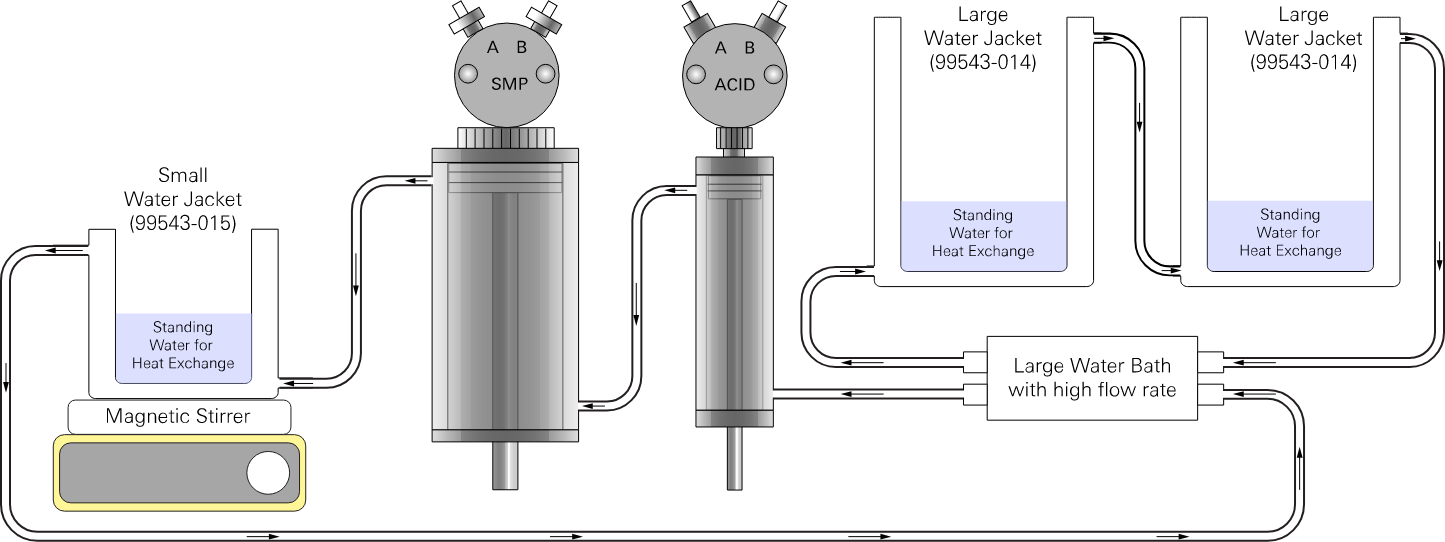
Two temperature control configurations are supported – parallel or serial flow paths. The water bath stabilizes temperature of the bottles and vial that are held in the water jackets. The space in each water jacket – surrounding each bottle and vial – should be filled with still water to create a thermal bridge between the water bath and bottle or vial.
Parallel flow with a large water bath
For a large water bath with a high flow rate, use a parallel arrangement with two water streams flowing in this order (see Figure 2‑2).
water bath → acid syringe → sample syringe → titration vessel → water bath
- and -
water bath → acid bottle → sample bottle → water bath
Serial flow with a small water bath
For a smaller water bath with a lower flow rate, use a serial connection with one stream of water flowing from (see Figure 2‑3).
water bath → acid syringe → sample syringe → titration vessel → acid bottle →
sample bottle → water bath
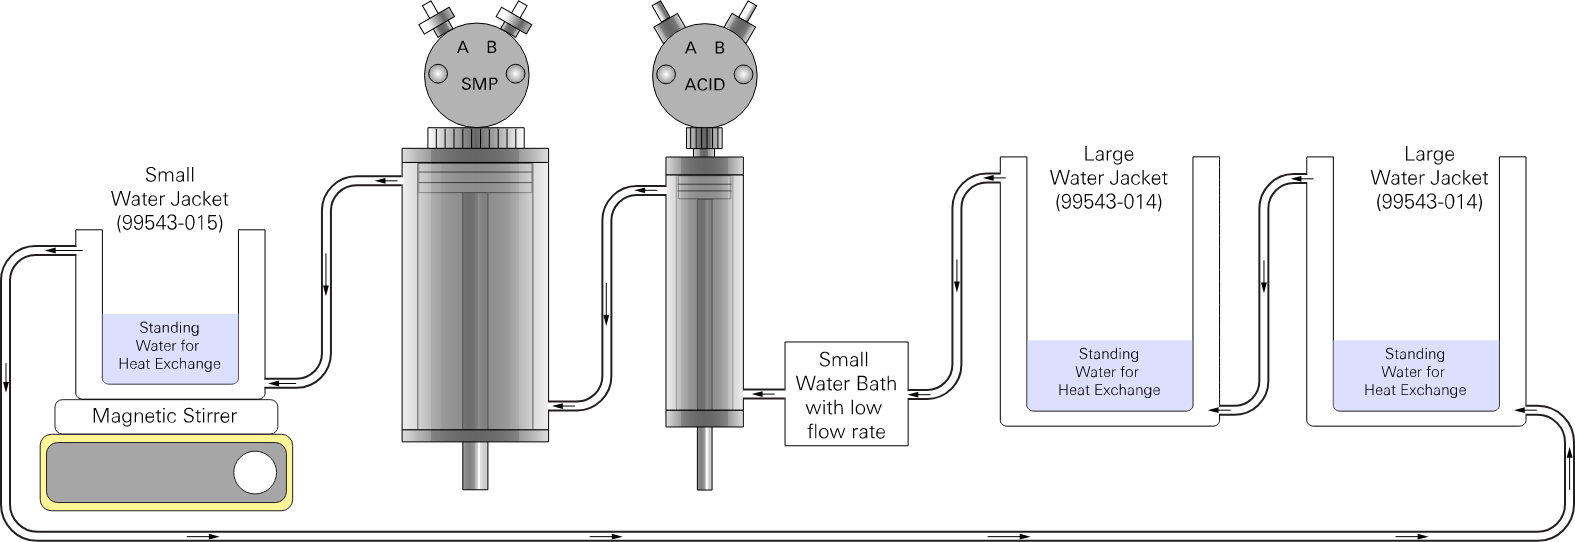
Many suitable water baths are available from commercial suppliers. You should determine the model of water bath based on your required temperature precision and the ideal bath volume.
pH Meter setup
The meter is configured to read absolute mV and output a measurement every 5 seconds. When running the titration program, the system will initialize the pH meter first. Do not change the pH meter settings unless you are familiar with the meter. See Bench-top A211 pH meter setup if the pH meter needs to be configured. For technical information about the pH meter, refer to its instruction manual. If you suspect that the pH meter is set incorrectly, follow the instructions to reconfigure the settings.
Open-cell titration configuration
Figure 2‑4 depicts the recommended open-cell titration configuration. During a measurement, you'll follow the instructions in the program. To summarize the procedure, add a sample to a clean, dry titration vessel and then remove the sample line. Place the titration beaker into the small water jacket (99543-015). Lower the pH electrode (with the HCl outlet) into the water sample carry out the measurement. The titrator is not limited to this configuration. Feel free to use your preferred cell configuration.
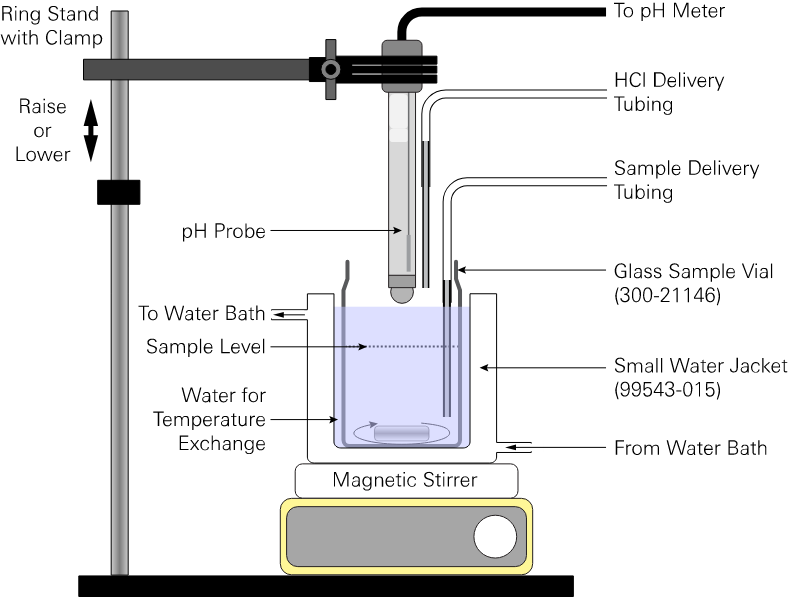
A clamp-on ring stand is ideal for holding the pH electrode. During each titration, the electrode can be lowered into the titration vessel by loosening the arm on the ring stand and sliding the electrode down. A stopper may be installed on the stand to mark the position where the clamp with the electrode should be lowered. Also, a small piece of Parafilm can be used to fix the HCl tubing outlet to the pH electrode so that both the electrode tip and HCl tubing outlet can be lowered into (or taken out of) the water sample/titration vessel easily.
HCl solution intake
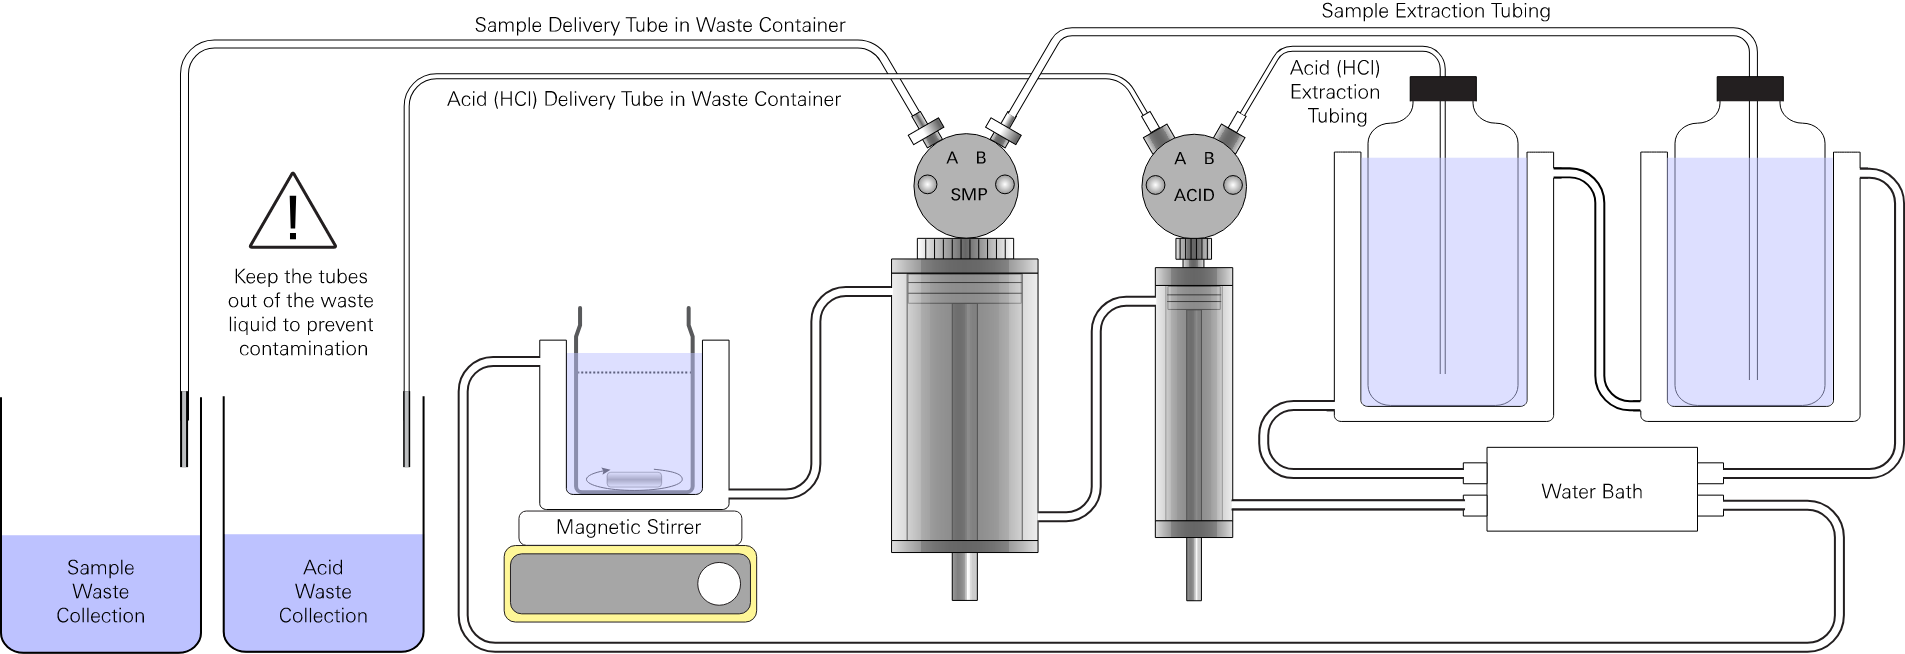
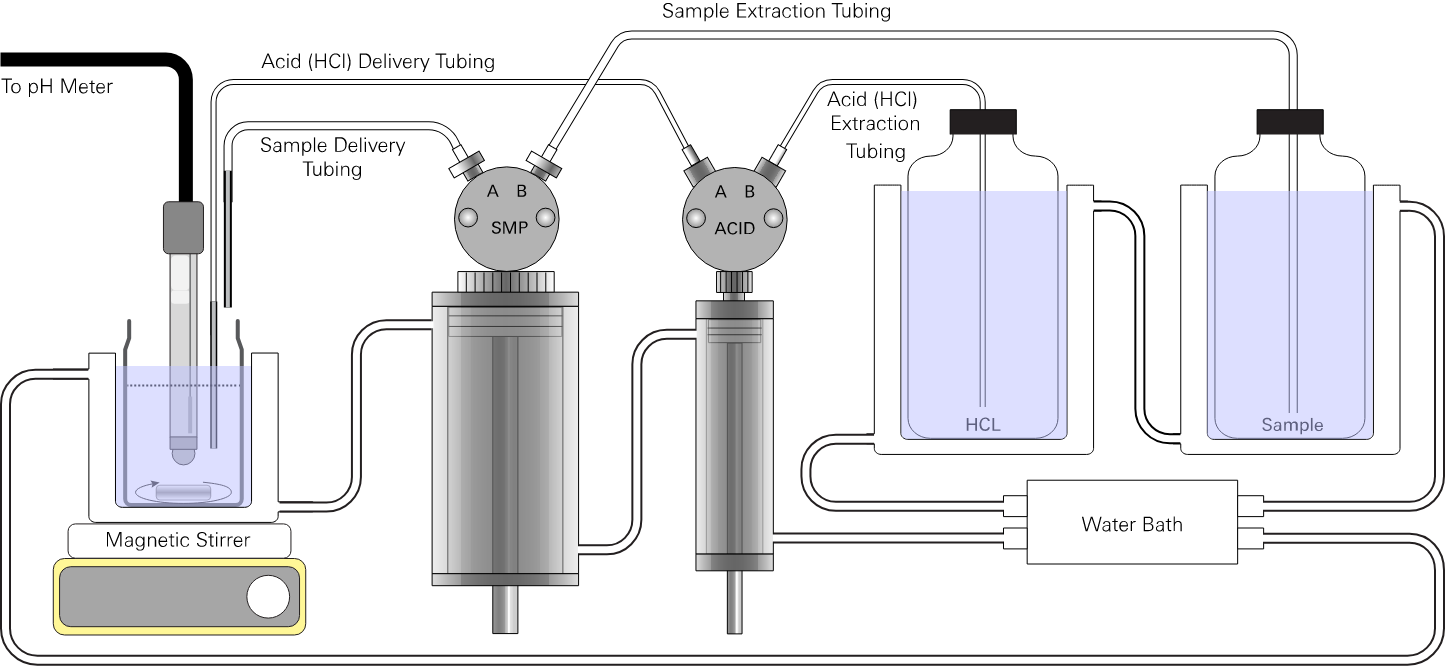
Port B on the acid pump (1/32" ID Tygon® tubing) draws HCl from the supply container. Be sure the capillary tube is present. Place the tube into the HCl solution container supplying the acid. The HCl intake must be submerged in the HCl solution at all times.
Port A on the acid pump (1/32" ID Tygon® tubing) delivers HCl titrant to the titration vessel. A piece of small-diameter, fine tipped tubing (either fine synthetic tubing or small glass capillary tubing) should be inserted into the end of the Tygon tubing to dispense the HCl solution into the titration vessel. The small-diameter tubing limits the diffusive exchange of HCl with the sample solution and improves the precision of the titration.
Standard or sample intake
Port B on the sample pump (1/16" ID Tygon® tubing) draws sample from the sample container. Place the capillary tube into the standard or sample. This is the recommended method when sufficient sample is available.
Port A on the sample pump (1/32" or 1/16" ID Tygon® tubing) delivers sample or standard solution to the titration vessel.
Waste solution containers
The analyzer will discharge waste solution before and after each measurement. You will be prompted by the software to move the tubes from the sample to the waste collection containers. Waste is discharged when you confirm the tube placement in the software.
Place one or two 500 mL or larger containers next to the analyzer. While a single waste container can be used, we recommend discharging seawater and HCl into separate containers so that the seawater tubing will not be contaminated by the acid. Check the container periodically, emptying it as needed to prevent overflow.
Caution: Note that the discharged HCl solution is a relatively strong acid. Always discard it according to local environmental regulations.
